Word Pressの超優良で且つ無料テーマであるSimplicity2のカスタマイズを備忘録的に残しています。
Simplicity2のカスタマイズの一覧は、こちらのページからご覧ください。
今回行うカスタマイズは、「主要カテゴリー6つの最新記事を、トップページ上段に表示させる」です。
どういうことかと言うと、こちらの記事(Simplicityで「主要カテゴリ最新記事」を表示する方法 / 部長ナビ)を完全にコピーさせて頂きました。
▼1080.comさんのトップページ
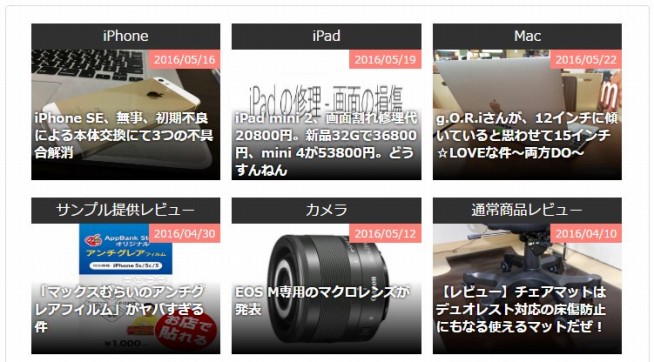
部長ナビさんのTOPページからお借りしました。
これですこれ。
トップページにズラーっと並ぶ記事一覧のさらに上に、主要カテゴリー6つの最新記事を表示させることが出来ると言うなんとも素晴らしいカスタマイズ。
メチャ格好良いですよね!
ということで、これをもう少し細かく解説しながらCSSコードはお借りしてカスタマイズしたいと思います。
最新記事を表示させるまでの手順
1.親テーマにある【list.php】を子テーマに移動させる
まず初めにCSSコードの編集をしたいページが【list.php】です。
でもこのページは元々は親テーマにしかないものなので、子テーマに移動しましょう。
移動の仕方はこちら⇒親テーマから子テーマへ、カスタマイズしたいページをコピーする方法【ロリポップサーバーの場合】をご覧ください。
ロリポップじゃなくて分からない人は、ググったりして頑張って子テーマへと移動させてください。(親テーマでもいいという方は自己責任で)
2.子テーマに移動させた【list.php】に追記
list.phpの67行目辺り~77行目あたりに以下のコードがあります。(黄色くしているのが77行目)
|
1 2 3 4 5 6 7 8 9 10 |
<?php //////////////////////////// //タグ説明文の挿入 //////////////////////////// if (is_tag() && //タグページの時 !is_paged() && //タグページのトップの時 tag_description()) : //タグの説明文が空でない時 ?> <!-- カテゴリの説明文 --> <div class="category-description tag-description"><?php echo tag_description(); ?></div> <?php endif; ?> |
▲ここまではそのままです。
この下に以下のコードを追加します。(部長ナビさんのコードを自分用に書き換えています)
|
1 2 3 4 5 6 7 8 9 10 11 12 13 14 15 16 17 18 19 20 21 22 23 24 25 26 27 28 29 30 31 32 33 34 35 36 37 38 39 40 41 42 43 44 45 46 47 48 49 50 51 52 53 54 55 56 57 58 59 60 61 62 63 64 65 66 67 68 69 70 71 72 73 74 75 76 77 78 79 80 81 82 83 84 85 86 87 88 89 90 91 92 93 94 95 96 97 98 99 100 101 102 103 104 105 106 107 108 109 110 111 112 113 114 115 116 117 118 119 120 121 122 123 124 125 126 127 128 129 130 131 132 133 134 135 136 137 138 139 140 141 142 143 144 145 146 147 148 149 150 151 152 153 154 155 156 157 158 159 160 161 162 163 164 165 166 167 168 169 170 171 172 173 174 175 176 177 178 179 180 181 182 183 184 185 186 187 188 189 190 191 192 193 194 195 196 197 198 199 |
<?php if (!is_mobile()) :?> <!-- 新着カテゴリ1段目左 --> <div class="top_article1"> <?php $cat = 'test1'; $num = '1'; global $post; $term_id = get_category_by_slug($cat)->term_id; $myposts = get_posts('numberposts=' .$num. '&category_name=' .$cat); if ($myposts) { foreach($myposts as $post): setup_postdata($post); ?> <a class="anchor" href="/category/test1/">テストカテゴリー1</a> <a class="thumbnail" href="<?php the_permalink() ?>"> <div class="top_article_thumb1"> <?php if(has_post_thumbnail()){ ?> <?php $title= get_the_title(); the_post_thumbnail(array(720, 480), array( 'alt' =>$title, 'title' => $title)); ?> <?php }else{ ?> <i class="ico-camera-alt"></i> <?php } ?> <span class="top_text_area1"><?php the_title(); ?></span> <span class="up-date1"><?php the_time('Y/m/d') ?></span> </div> </a> <?php endforeach; ?> <?php }else{ ?> <p>記事がありません</p> <?php } ?> </div> <!-- 新着カテゴリ1段目中央 --> <div class="top_article2"> <?php $cat = 'test2'; $num = '1'; global $post; $term_id = get_category_by_slug($cat)->term_id; $myposts = get_posts('numberposts=' .$num. '&category_name=' .$cat); if ($myposts) { foreach($myposts as $post): setup_postdata($post); ?> <a class="anchor" href="/category/test2/">テストカテゴリー2</a> <a class="thumbnail" href="<?php the_permalink() ?>"> <div class="top_article_thumb1"> <?php if(has_post_thumbnail()){ ?> <?php $title= get_the_title(); the_post_thumbnail(array(720, 480), array( 'alt' =>$title, 'title' => $title)); ?> <?php }else{ ?> <i class="ico-camera-alt"></i> <?php } ?> <span class="top_text_area1"><?php the_title(); ?></span> <span class="up-date1"><?php the_time('Y/m/d') ?></span> </div> </a> <?php endforeach; ?> <?php }else{ ?> <p>記事がありません</p> <?php } ?> </div> <!-- 新着カテゴリ1段目右 --> <div class="top_article3"> <?php $cat = 'test3'; $num = '1'; global $post; $term_id = get_category_by_slug($cat)->term_id; $myposts = get_posts('numberposts=' .$num. '&category_name=' .$cat); if ($myposts) { foreach($myposts as $post): setup_postdata($post); ?> <a class="anchor" href="/category/test3/">テストカテゴリー3</a> <a class="thumbnail" href="<?php the_permalink() ?>"> <div class="top_article_thumb1"> <?php if(has_post_thumbnail()){ ?> <?php $title= get_the_title(); the_post_thumbnail(array(720, 480), array( 'alt' =>$title, 'title' => $title)); ?> <?php }else{ ?> <i class="ico-camera-alt"></i> <?php } ?> <span class="top_text_area1"><?php the_title(); ?></span> <span class="up-date1"><?php the_time('Y/m/d') ?></span> </div> </a> <?php endforeach; ?> <?php }else{ ?> <p>記事がありません</p> <?php } ?> </div> <!-- 新着カテゴリ2段目左 --> <div class="top_article1"> <?php $cat = 'test4'; $num = '1'; global $post; $term_id = get_category_by_slug($cat)->term_id; $myposts = get_posts('numberposts=' .$num. '&category_name=' .$cat); if ($myposts) { foreach($myposts as $post): setup_postdata($post); ?> <a class="anchor" href="/category/test4/">テストカテゴリー4</a> <a class="thumbnail" href="<?php the_permalink() ?>"> <div class="top_article_thumb1"> <?php if(has_post_thumbnail()){ ?> <?php $title= get_the_title(); the_post_thumbnail(array(720, 480), array( 'alt' =>$title, 'title' => $title)); ?> <?php }else{ ?> <i class="ico-camera-alt"></i> <?php } ?> <span class="top_text_area1"><?php the_title(); ?></span> <span class="up-date1"><?php the_time('Y/m/d') ?></span> </div> </a> <?php endforeach; ?> <?php }else{ ?> <p>記事がありません</p> <?php } ?> </div> <!-- 新着カテゴリ2段目中央 --> <div class="top_article2"> <?php $cat = 'test5'; $num = '1'; global $post; $term_id = get_category_by_slug($cat)->term_id; $myposts = get_posts('numberposts=' .$num. '&category_name=' .$cat); if ($myposts) { foreach($myposts as $post): setup_postdata($post); ?> <a class="anchor" href="/category/test5/">テストカテゴリー5</a> <a class="thumbnail" href="<?php the_permalink() ?>"> <div class="top_article_thumb1"> <?php if(has_post_thumbnail()){ ?> <?php $title= get_the_title(); the_post_thumbnail(array(720, 480), array( 'alt' =>$title, 'title' => $title)); ?> <?php }else{ ?> <i class="ico-camera-alt"></i> <?php } ?> <span class="top_text_area1"><?php the_title(); ?></span> <span class="up-date1"><?php the_time('Y/m/d') ?></span> </div> </a> <?php endforeach; ?> <?php }else{ ?> <p>記事がありません</p> <?php } ?> </div> <!-- 新着カテゴリ2段目右 --> <div class="top_article3"> <?php $cat = 'test6'; $num = '1'; global $post; $term_id = get_category_by_slug($cat)->term_id; $myposts = get_posts('numberposts=' .$num. '&category_name=' .$cat); if ($myposts) { foreach($myposts as $post): setup_postdata($post); ?> <a class="anchor" href="/category/test6/">テストカテゴリー6</a> <a class="thumbnail" href="<?php the_permalink() ?>"> <div class="top_article_thumb1"> <?php if(has_post_thumbnail()){ ?> <?php $title= get_the_title(); the_post_thumbnail(array(720, 480), array( 'alt' =>$title, 'title' => $title)); ?> <?php }else{ ?> <i class="ico-camera-alt"></i> <?php } ?> <span class="top_text_area1"><?php the_title(); ?></span> <span class="up-date1"><?php the_time('Y/m/d') ?></span> </div> </a> <?php endforeach; ?> <?php }else{ ?> <p>記事がありません</p> <?php } ?> </div> <?php endif; ?> |
実は上記コードはそのままコピペするだけではうまくいきません。
なぜなら自分でカテゴリーを作った際に、そのカテゴリー用のURLをそれぞれ作ったと思います。
表示させたい最新記事は、自分で作ったURL(スラッグ)に書き換えてあげないと反応しないんです。
以下、自分のカテゴリーのURLを記入するとはどういうことか説明しています。
▼1段目左のCSSコードの一部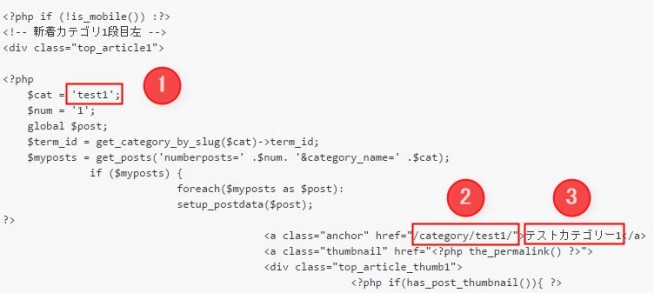
上記は実際に先程記載したコードの一部です。
①②③を変更する必要がありますが、それぞれ解説しておきます。
ここを自分がカテゴリーを作った時に指定したURL(スラッグ)に書き換えます。
言い換えれば、【自分のドメイン/category/ここの部分/】のURLを書くということ。
【test1】と書かれているものを自分のカテゴリーのURLに変更すれば、指定したカテゴリーの最新記事が表示されることになります。
これは上部に表示されるタイトルをクリックした時に移動させたいURLを書きます。
もし最新記事を表示させているカテゴリーと違うカテゴリーのページを表示させたいという場合、Simplicity2で言えば【*-*(自分のドメイン)-*.com/category/カテゴリーURL/】となっているはずなので、赤字の部分を【/category/test1/】と書かれている部分と書き換えます。
それでリンクがちゃんと反応するはず。
ここは②で設定したURLリンクの表示名をどうするかというものです。
②で設定したカテゴリーURLのカテゴリー名にしておくのが無難かと。
僕の場合で言うと、①でテストカテゴリー1の最新記事を表示させて、②と③でその上部に表示される文字を【テストカテゴリー1】として、そのままテストカテゴリー1のリンクに飛ぶようなコードになっています。
これで【list.php】に記述するコードは終わりです。
3.スタイルシート(style.css)に追記する
ここも好みで色々な色にカスタマイズが出来ますが、部長なびさんからは少し色合いを変えて下記のコードを追記します。
|
1 2 3 4 5 6 7 8 9 10 11 12 13 14 15 16 17 18 19 20 21 22 23 24 25 26 27 28 29 30 31 32 33 34 35 36 37 38 39 40 41 42 43 44 45 46 47 48 49 50 51 52 53 54 55 56 57 58 59 60 61 62 63 64 65 66 67 68 69 70 71 72 73 74 75 76 77 78 79 80 81 82 83 84 85 86 87 88 89 90 91 92 93 94 95 96 97 98 99 100 101 102 103 104 105 106 107 108 109 110 111 112 113 114 115 116 117 118 119 120 121 122 123 124 125 126 127 128 129 130 131 132 133 134 135 136 137 138 139 140 141 142 143 144 145 146 147 148 149 150 151 152 153 154 155 156 157 158 159 160 161 162 163 164 165 166 167 168 169 170 171 172 173 174 175 176 177 178 179 180 181 182 183 184 185 186 187 188 189 190 191 192 193 194 195 196 197 198 199 200 201 202 203 204 205 206 207 208 209 210 211 212 213 214 215 216 217 218 219 220 221 222 223 224 225 226 227 228 229 230 |
/*--------------------------------- 主要カテゴリーの最新記事表示 --------------------------------*/ .top_article1 { margin:0 5px 20px 0px; float: left; width: 32%; } .top_article2 { margin:0 8px 20px 8px; float: left; width: 32%; } .top_article3 { margin:0 0px 20px 5px; float: left; width: 32%; } .top_article_thumb1 { width: 100%; overflow: hidden; position: relative; } .top_article1 .anchor { padding: 3px 5px; display: block; color: #fff; background: #2c7cff; font-size: 16px; text-decoration: none; overflow: hidden; *zoom: 1; text-align: center; } .top_article1 .anchor:hover, .top_article1 .anchor:active { text-decoration: underline; } .top_article1 .anchor span { float: right; font-size: 9px; background: #fff; color: #333; padding: 5px 3px; } .top_article1 .thumbnail { display: block; color: #333; background: #fff; text-decoration: none; line-height: 1.5; font-size: 16px; position: relative; overflow: hidden; *zoom: 1; } .top_article1 .thumbnail img { width: 240px; height: 150px; display: block; } .top_article1 .thumbnail:hover { color: #bad3ff; background: #bad3ff; } .top_article1 .thumbnail:hover img { opacity: 0.7; filter: alpha(opacity=70); } .top_article1 .thumbnail .title { padding: 3px; height: 70px; } .top_article2 .anchor { padding: 3px 5px; display: block; color: #fff; background: #FF4C4C; font-size: 16px; text-decoration: none; overflow: hidden; *zoom: 1; text-align: center; } .top_article2 .anchor:hover, .top_article2 .anchor:active { text-decoration: underline; } .top_article2 .anchor span { float: right; font-size: 9px; background: #fff; color: #333; padding: 5px 3px; } .top_article2 .thumbnail { display: block; color: #333; background: #fff; text-decoration: none; line-height: 1.5; font-size: 16px; position: relative; overflow: hidden; *zoom: 1; } .top_article2 .thumbnail img { width: 240px; height: 150px; display: block; } .top_article2 .thumbnail:hover { color: #fcbec1; background: #fcbec1; } .top_article2 .thumbnail:hover img { opacity: 0.7; filter: alpha(opacity=70); } .top_article2 .thumbnail .title { padding: 3px; height: 70px; } .top_article3 .anchor { padding: 3px 5px; display: block; color: #fff; background: #336666; font-size: 16px; text-decoration: none; overflow: hidden; *zoom: 1; text-align: center; } .top_article3 .anchor:hover, .top_article3 .anchor:active { text-decoration: underline; } .top_article3 .anchor span { float: right; font-size: 9px; background: #fff; color: #333; padding: 5px 3px; } .top_article3 .thumbnail { display: block; color: #333; background: #fff; text-decoration: none; line-height: 1.5; font-size: 16px; position: relative; overflow: hidden; *zoom: 1; } .top_article3 .thumbnail img { width: 240px; height: 150px; display: block; } .top_article3 .thumbnail:hover { color: #92c8c8; background: #92c8c8; } .top_article3 .thumbnail:hover img { opacity: 0.7; filter: alpha(opacity=70); } .top_article3 .thumbnail .title { padding: 3px; height: 70px; } .top_text_area1 { padding: 4px 4px 0; position: absolute; bottom: 0; right: 0; left: 0; color: #fff; font-weight: bold; overflow: hidden; height: 80px; line-height: 20px; font-size: 15px; text-decoration: none; background: rgba(3,3,3,0.6); background: -webkit-gradient(linear,left top,left bottom,from(rgba(0,0,0,0)),to(rgba(2,2,2,1.0))); background: -moz-linear-gradient(top, rgba(0,0,0,0), rgba(2,2,2,1.0)); text-shadow: 0 0 5px rgba(0,0,0,1.0); } .up-date1{ position:absolute; top:0px; right:0px; background-color: #f8f8ff; border:1px solid #f8f8ff; color: #444444; display: inline-block; font-size: 12px; line-height: 1.5; margin: 0; padding: 2px 5px 0; } |
上記コードで黄色く表示している行は、部長ナビさんが紹介してくれているコードからは自分のカラー用に変更した箇所です。
簡単に言うと、上部のタイトル部分を左から青・赤・緑のタイトルカラーにしてみたこと。
そしてタイトルの下に出てくる投稿日の枠内の色を白というかアイボリーっぽい色に変更しています。
またこのカスタマイズでは記事一覧の枠線を消しているので、サムネイル画像の幅が220pxだと足りなかったので240pxに変えました。
▼これでトップページの記事一覧の上に、6つのカテゴリーの最新記事が表示されるようになりました。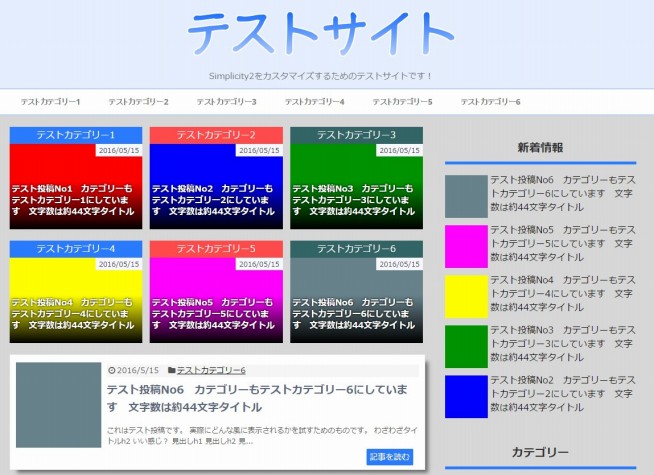
テストカテゴリーとして1~6まで作ってましたが、うまく6つのカテゴリーの最新記事が表示されています。
注意点としては、このカスタマイズを行った場合、表示させているカテゴリーのページに行った場合も上部には6つの記事が表示されることになります。
それ以外のカテゴリーのページに行った場合は表示されません。
主要カテゴリー6つの最新記事を表示する / まとめ
ブログ形式で行おうと思っている場合は、もしかすると必要のないカスタマイズかもしれません。
僕の場合は少しだけポータルサイト風にも出来たらいいなと思ったので、このカスタマイズを真似させて頂きました。
細かく説明してますが、カスタマイズのCSSコードは部長ナビさんが紹介してくれているコードをそのままコピーさせてもらってます。
カスタマイズに挑戦したい人は、ぜひ参考にしてもらえれば幸いです。
次のページはこちら⇒【Simplicity2カスタマイズ⑩】カエレバ・ヨメレバ・トマレバをカスタマイズする!














コメントを残す